• Thanks for stopping by. Logging in to a registered account will remove all generic ads. Please reach out with any questions or concerns.

Milnet Decision Game 3: Enemy Across the Bridge

Infanteer

Moderator
Staff member
Directing Staff
Donor
Reaction score
10,100
Points
1,260
Ok, just in time for the holidays is another decision game.  I'm scaling back the scope on this one, and going down into land tactics, as I bet it is in most reader's comfort zone.  This problem represents a hypothetical modern-day Baltic warfighting scenario, and is based off an old problem from a Marine Corps Gazette Tactical Decision Game.

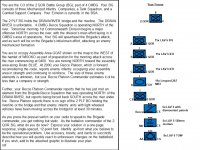
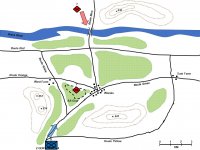
This problem looks at the command decision making in light of (1) changes to the situation and (2) lack of direction from the higher commander.  This is the essence of mission command and commander's intent, those concepts that we love to preach in Canadian Army doctrine.  Download the document CommandProblem3 and come up with a solution to the dilemma facing the CO of the 2 QOR BG.  Don't get caught up in issues such as enemy capabilities or equipment.  Also note that you aren't provided with the actual 4 CMBG OPORD with Commander's Intent, etc, etc.  Don't worry about it - the text explains what you are supposed to be doing clearly enough that you don't need to get fixated on prose from a written OPORD.

The response can be given in a SMESC FRAGO format, or just written in plain English (ou Francais).  Remember to give your understanding of the tactical problem, and what you intend to do in light of the changing situation on the ground.

This problem will be open until 18 December 2018, after which the responses will be judged and then discussed here.  Email responses to milnetDG@milnet.ca.

Any questions can be posted to this thread or emailed to the milnetDG address. 
 

Attachments

  • Command_Problem3.JPG
    Command_Problem3.JPG
    243.4 KB · Views: 434
  • Command_Problem3_Map.JPG
    Command_Problem3_Map.JPG
    155.6 KB · Views: 430
I do love me some TDG action. I’ll try to get to this over the weekend between the At Home, Kids Christmas Party and Subbies Carolling.  Sunday could be painful...
 
Haligonian said:
Sunday could be painful...

It could be more painful for the 2 QOR BG.... :Tin-Foil-Hat:
 
It's been about a week and I've gotten reponses.  They look great, and I encourage more folks to submit a solution.

It doesn't have to be technical, or a long piece of writing.  A simple paragraph describing your view of the problem and what you would have your unit do can be enough to simulate discussion and different perspectives.
 
You got an email from me - I suspect I did things wrong...alas. 

Let me know how far off the Sailor's solution is!

NS
 
Submitted. That was a good problem. Thanks for putting that together.
 
Submitted, let me know if its not there. Definitely had fun with this one.
 
Got 'em all gents.  Good work.  There are different approaches here, so the post-mortem should be worthwhile.
 
Nice distraction from my day job.  Thank you (and submitted)  :2c:
 
Just an update folks, I've got a half dozen solutions, and they are good, with some different approaches to the problem.  I want to leave the door open for more - I'll keep the DG up until the end of the week (Fri 21 Dec) if anyone wishes to submit.  We'll chew over the problem after XMas and I have another DG in the hopper related to this problem.
 
Alright, thanks for the last minute responses.  I'll take the half-dozen or so submissions and compare them over the Christmas Break, and we can discuss the problem in the New Year.  While you're all drowning in Moose Milk, take a look at Decision Game 4, which is related to this problem.
 
Alright, I've found some post holiday time to go through the responses.  First off, thanks to everyone who submitted - they all had some real effort and thought put into them.  There were seven responses submitted this month.  The winner for this month Technoviking!

I based the criteria for this month's problem on four factors:

1.  Making a Decision in the absence of order!  The good news is everyone who responded made a decision.  I think the solution of "dig in and try to get communications with higher" hands the initiative to the enemy and probably doesn't leave much room for a successful outcome for the Blue side.  While there are no "right" or "wrong" answers, doing nothing, or acting passively certainly appears to me to be the "least optimal" course.

2.  Determination of the critical operational issue.  This, in my view, involves considering multiple perspectives.  The critical operational issue for the battalion may be the assembly area.  But that triangular wood only held value when it served as a jumping off point for a launch across the river.  Is it relevant anymore?  The hills could be critical to the battalion to stabilize the situation.  To me, the key is to start looking higher - what is important to 4 CMBG and 1 Commonwealth Division?  I'd argue the bridge.  Here is a crossing point that the formation held and now does not - getting that back, in my view, is thinking one and two levels up.  Reclaiming the woods near Wisoko may set you up to do other things, but does it do much for your commander, who probably doesn't know how pear shaped things have gone?  The bridge is probably the key to reclaiming initiative in this scenario.

3.  Main effort.  How does the solution link the critical operational issue to its solution, and how does it weight this as a main effort.  A big part of this will be any resources the solution puts towards its main effort in terms of time, space, and resources to ensure that issue is dealt with.  What sort of sequencing and timing is applied to ensure the plan can achieve its goal.  Solutions that keep things simple and focus on the identified main effort are less likely to suffer from the inevitable frictions that will arise once forces are launched.  Clearly, how the BG employs its tanks in the solution should indicate where the main effort is, followed by the mortars.  As well, all seven responses advocated some sort of attack - how does weighting the main effort and deciding on a scheme of manoeuvre take into consideration some defensive responsibilities the 2 QOR BG has in terms of limiting the enemy's penetration?

4.  Reserve.  What does the solution do with regards to a reserve?  The reserve is the means by which a commander deals with uncertainty, and in this situation, with comms down, and the enemy where we thought there were friendlies, there is a lot of uncertainty.  As well, there are two problems - a bridge in unfriendly hands and an assembly area with enemy in it - that are spread by 3-4 KM, so the physical location of the reserve needs to be considered.  It's well enough to designate a reserve, but you want to put it somewhere where you think it will be useful.

These were the factors decided prior to the game, but on top of that, I noticed some other things.  All the solutions demonstrated some good efforts to estimate what the enemy was doing.  There is no "DS solution" - I didn't make any secret dispositions, I just presented a murky situation to help guide the problem.  Thinking about the enemy is critical to deciding what to do, something that will be explored in Decision Game 4, if you haven't already looked it over.

This solution also forces us to consider the meeting engagement.  We don't really know where the enemy is, or how much of him there is.  We have three avenues - around the 212/214 feature (left), up Route Blue (centre) or around Route Yellow (right).  What option offers a mix of security and speed - both essential to surprise?  What are the risks of a meeting engagement on each of these routes?  How can the reserve respond to each of these routes.  I think, if I was CO 2 QOR sitting in a command vehicle, that I'd have to quickly trace each route and wargame in my head the likelihood of "if I run into the enemy here, then what?" at numerous points.

Finally, a few solutions also mentioned various ways of trying to re-establish comms with higher headquarters.  It almost seems like an afterthought, but mission command isn't all about running around as one sees fit.  There is an imperative to try and advise Comd 4 CMBG on what is going on, even after you've made the decision to launch.  Perhaps this isn't something that the CO should concern himself or herself with - a good unit would probably have a lost comms SOP, perhaps with the DCO to quarterback that effort.

Anyways, here is a rough run down of the seven responses as I tried to categorize them for anyone's interest.  If I got something wrong, its because I had to try and draw the idea out of the solution, or just misread things - communication is always a challenge in tactics!

Solution 1:  Vital Ground - Bridge.  Mission - Seize Bridge.  ConOps - Attack Assembly Area with 1 x Cbt Tm, attack and seize bridge from right with BG(-).  Reserve - Coy.

Solution 2:  Vital Ground - Bridge.  Mission - Seize Bridge.  ConOps - Attack by fire Assembly Area with 2 x Cbt Tm, attack and seize bridge from right with BG(-) (Coy + Tk Sqn).  Reserve - Coy.

Solution 3:  Vital Ground - Near Side.  Mission - Block Enemy.  ConOps - Attack AA with BG, seize AA and contain enemy bridgehead to enable FPL of Bde forces.  Reserve - Tk Sqn.

Solution 4:  Vital Ground - Near Side.  Mission - Block Enemy.  ConOps - Attack AA with BG, seize AA and contain enemy bridgehead, attempt to regain contact with 2 PLF.  Reserve - Cbt Tm.

Solution 5:  Vital Ground - Bridge.  Mission - Secure Bridge.  ConOps - Block further enemy penetration from AA with 1x Coy, with second Coy attacking AA by fire, attack and seize bridge from left with BG(-) (Coy + Tk Sqn).  Reserve - None.

Solution 6:  Vital Ground - Bridge.  Mission - Secure Bridge.  ConOps - Attack AA with BG, reorg and attack bridge with a BG from right,  Reserve - None.

Solution 7:  Vital Ground - Near Side.  Mission - Clear Near Side.  ConOps - Attack AA with BG up centre, reorg and advance to bridge,  Reserve - None.

I look forward to any additional comments here.  Feel free to raise any additional issues or considerations I may of missed, either on this thread or via email/PM.
 
Yes, nice work.  Your diagram approach great and I easily understood what you were proposing to do.
 
I think in my initial write-up (before I switched to the diagram approach) I'd had a blurb about sending my DCO or a rep from the Recce Platoon back to the higher level as a runner, but missed that in my diagrammatic re-write.  In the end though, the DCO/RSM would end up being required with the consolidation of forces on AA Goat for Casualty and POW management.  In my Phase 4 diagram, you can see that A Coy is lagging behind the bridge assault - I should have indicated that this was the reason.  As you could tell, I like the 'distraction fires' from an opposite direction, then having the attack come from a different direction.  I relied on that in both the assault on AA Goat and the Bridge crossing.

Great game!  (Not too shabby for a grumpy Navy Chief who's last time in the field was actually Cornwallis...?)

 
Here's my solution for those interested.  Diagram attached.  I think it's solution 2 above?  Happy to hear any critique.

For me it was fairly clear that I had to prioritise controlling the river to enable my boss and boss's boss but I put some thought into whether the enemy in GOAT was really a problem or not.  What I concluded was that GOAT was ultimately irrelevant to my original plan as it was no longer valid, however, a coy sized enemy element wandering around in my rear was not going to be tenable.  I considered looking for Bde to clean up that problem with a trailing BG but concluded that there was so much friction already that that would be a coordination nightmare  so I needed to own both the problem of the river and GOAT but I couldn't afford to throw the entire BG at the GOAT problem.

The other part I wanted to work through was the task organization for seizing the bridgehead.  Due to the requirement to get this done quickly, impose shock, and deal with potential armoured elements that I assumed were present based on the recce sqn and the PLF having been pushed off, I knew this would be a job that required tanks.  I also wanted an infantry component due to the amount of vegetation.  They would also be available to help consolidate the bridge head.  I wanted to avoid a square cbt tm due my thoughts on the subject that have been discussed on here in other places, so I attached a platoon to the tank sqn and put the remainder of the coy in reserve at EAST FARM where I could rapidly commit them in support of the Sqn.  The other thought that occurred to me was that I should enable my commander on the Main Effort by giving him the entire coy, creating a square cbt tm; perhaps hold back one platoon as the BG reserve.  I'm curious to hear others thoughts on that.


Problem: The Division’s plan for offensive operations are now threatened by the lack of near bank security and the plan to establish a bridge head is seriously threatened by virtue that the PLF are nowhere to be found and the Bde’s ME (my BG) now must change the plan. With the Division attack supposed to start in eight hours there is now substantial changes required in little time, with degraded communications, and substantially degraded situational awareness of enemy and friendly forces. Within my area there is a potential coy sized enemy element between my BG and the river which threatens my plan, and potentially the brigade’s, and division’s plan. While the enemy coy in GOAT is a threat my primary responsibility is to make options for my boss and his by gaining control of the river to stem the flow of enemy forces over the river and enable our own offensive operations over the river.

Assumptions: Despite reports that mtzd forces are crossing the river there must be mechanized or armoured forces in the area as motorized forces should not have been able to push back both the bde recce sqn and the PLF. This could be the enemy formation I was tasked to attack as part of the original plan or another unit/fmn may have entered the area without our knowing. AA GOAT is now a likely AA for the enemy as they cross the river and prepare to either take offensive action or establish a defensive zone. The enemy will want to use the river as a natural obstacle and will not want to commit sizable forces forward of the river. This is then likely a spoiling attack meant to disrupt our attack and gain additional time for themselves, or they have decided to create additional depth by establishing a security area forward of the river and their main positions.

Wng O:

Sit: En forces have pushed off the Bde recce sqn and the PLF BG and are reinforcing with mtzd units across the DRAVA river. An en infantry element of approximately coy size has occupied AA GOAT. C/S 6 has made face to face contact with elements of the Bde recce sqn but the locations of the remaining elements of the sqn and the entire PLF BG are unknown. The DRAVA river is currently not held by friendly forces. It is likely that the Bde CP is currently under electronic attack or has been hit by kinetic fires. I assess that the enemy has pushed forward to either conduct a spoiling attack to disrupt our offensive operations or to establish a security area to grant them greater depth to their defence.

Probable Msn: 2 QOR BG will SEIZE the near side of the DRAVA river bridge head to enable offensive operations by 1st Commonwealth Division.

Tasks: A Coy and B Sqn can commence movt to EAST FARM via route yellow.
6, Tell the elems of the recce sqn in locn with you to come up on our C/S 0 and move to an AA south of the 245 feature. I want a consolidated sitrep from them in 5 mics. I want you to picket and bypass AA GOAT and immediately SCREEN north of the DRAVA river.
9B, get me comms with Bde. If we don’t already have an LO there, then send one back following my radio orders with a sat phone or civi cell phone. C/S 8 maybe another option as they’re in the BSA.
Orders: Via radio in 15 mins.

Orders:

Sit: N/C

Msn: Confirmed. 2 QOR BG will SEIZE the near side of the DRAVA river bridge head to enable offensive operations by 1st Commonwealth Division.

Exe:
Intent: Our purpose is to enable further offensive operations by the bde and div and stem the flow of enemy forces over the DRAVA river. We’ll achieve this by gaining control of the river and disrupting en elems currently between us and the river. The End State sees the near side of the DRAVA river secure,
en elems in AA GOAT neutralised, and 2 QOR BG postured to carry on with off ops over the DRAVA river or to pass friendly units through us.

SoM / Tasks:
Ph 1: The near side of the DRAVA River Bridge head will now be known as Obj RED. C/S 6, N/C to your task to SCREEN NORTH of the DRAVA river. Pay particular attention to the 236 feature. B Sqn with one platoon attached from A Coy will attack from EAST FARM to SEIZE Obj RED. B Sqn should be prepared to exploit north of the DRAVA river if enemy resistance is light and the near side is cleared. Your attack can begin once mortars are firecapped. A Coy (-) is BG reserve and OCCUPIES EAST FARM. A Coy should BPT reinforce B Sqn. B Coy ATTACKS BY FIRE on AA GOAT from the 212/214 feature. Move to that location following orders. C Coy ATTACKS BY FIRE on AA GOAT from the 245 feature. Move to that location following orders. B and C Coys are cleared to engage once in location. Coordinate to achieve simultaneity in your attack. C/S 7 to GUARD the BG’s EAST and WEST flanks, try to gain contact with flanking units. Move to your locations now. Mortars to OCCUPY a posn where they can provide fires 2 km NORTH of the DRAVA river. Pri of fire is with B Sqn. C/S 8 to BPT to push forward ammo resupply prior to Ph 2. Phase ends once B Sqn has seized the near side of the DRAVA.

Ph 2: B Coy CLEARS AA GOAT on order. C Coy SUPPORTS BY FIRE C Coy’s attack and C Coy’s dismounts FOLLOW AND SUPPORT B Coy’s clearance of AA GOAT. B Sqn RETAINS the DRAVA river bridgehead. A Coy (-) remains in BG reserve. C/S 7 continues to GUARD the BG’s EAST and WEST flanks. Pri of fire switches to B Coy. Mortars to fire prepatory fire mission on AA GOAT prior to B Coy’s asslt. Frag O to follow for Ph 2.

Ph 3: Further off ops or FPoL. Frag O to follow for Ph 3.

ME: Ph 1: B Sqn on SEIZING Obj RED.
Ph 2: B Coy on CLEARING GOAT.

Coordinating Instructions:
Open Fire Policy: PID req’d within built up areas. During Ph 1, B Coy prohibited to have 25mm effects into WISOKO. Spec fire authorized and encouraged particularly for B and C Coys as part of their ATTACK BY FIRE.
Routes: B Sqn and A Coy to use Route Yellow to get to EAST FARM. All other routes direct.

Svc Sp:
Pri of Resup: 120mm, 81mm, 25mm, 7.62mm

Command and Sigs:
Loc of Comd: Ph 1: Following B Sqn. Ph 2: IVO the 245 feature initially and then trailing the aslt elms.
 

Attachments

Haligonian,

I did not submit a solution, but i did consider the problem. I too, recognized that the bridge was the main problem and the GOAT was a side show- a sideshow that could still ruin your day, if not handled correctly.

My inclination was to picket GOAT from the high features using elms of Recce and Anti-Armour platoon. Mortar Pl would initially deploy its baseplates west of the high feature. Mortar Pl fires would be used either on GOAT to keep the EN there from getting too ambitious or on the bridgehead as the BG assualted it ( see below).

My next inclination was to left flank from the west with tanks leading until wooded defile, then pass a rifle company thru to clear the woods and assualt off the march onto the bridgehead. I was leary of going to the East, being nearly certain that i would come under observation and direct fire from the high feature across the river into my flanks. If that went well, i could consider using my trailing Rifle Coy to turn and assault GOAT. If it didnt go well- at least i would have blunted bridgehead and given my Bde Comd at least a place to start from to counter attack.

A fun problem.
 
SeaKingTacco said:
Haligonian,

I did not submit a solution, but i did consider the problem. I too, recognized that the bridge was the main problem and the GOAT was a side show- a sideshow that could still ruin your day, if not handled correctly.

My inclination was to picket GOAT from the high features using elms of Recce and Anti-Armour platoon. Mortar Pl would initially deploy its baseplates west of the high feature. Mortar Pl fires would be used either on GOAT to keep the EN there from getting too ambitious or on the bridgehead as the BG assualted it ( see below).

My next inclination was to left flank from the west with tanks leading until wooded defile, then pass a rifle company thru to clear the woods and assualt off the march onto the bridgehead. I was leary of going to the East, being nearly certain that i would come under observation and direct fire from the high feature across the river into my flanks. If that went well, i could consider using my trailing Rifle Coy to turn and assault GOAT. If it didnt go well- at least i would have blunted bridgehead and given my Bde Comd at least a place to start from to counter attack.

A fun problem.

I also thought of a single Coy going in on GOAT which would have freed up a Coy to follow and support the tank sqn thereby alleviating a number of concerns but I was worried about the ratio of pitting a single coy against another coy in a hasty attack.

I like picketing with anti armour.  It would have cost me my flank protection but I could have used them to fix the enemy in GOAT and then came back and cleaned it up later.
 
I did not submit an estimate, nor conduct a full estimate and plan.

But my take was:
(1) Speed is of the essence, since it appears the enemy is reinforcing on the far bank;
(2) Therefore, FIX the enemy in GOAT and let follow on forces take care of them;
(3) CLEAR the enemy off the far bank, since they provide overwatch on the bridge we need to hold; and
(4) SEIZE the high feature NE of the bridge, since it commands the battlespace.


Finally, since it's a QoR battlegroup at 2000, I'm assuming that there's a decent sherry for me and the RSM to sip as we harrumph about the situation.
 
Back
Top