• Thanks for stopping by. Logging in to a registered account will remove all generic ads. Please reach out with any questions or concerns.

Canadian Centurion tank

You need a better tac sign stencil. Also I'd cut back a bit on the surface area that the brown bit in the middle covers. But that's just me.

Good work. Makes me want to get back to my own modeling.

🍻
I basically want to have my colors as perfect as I can get them for when my 1/16 scale m113 and Centurion come, as well as an airbrush so I don't have these messy brush strokes
 
I shouldn't be talking as I had set aside both my model railroad and working on military miniatures for almost 30 years and just got back into both hobbies. And yes that means that I'm using a lot of thirty-year-old cans and bottles of paint. I tend to weather my kits so there is an underlying need to get the colours close to right but not exact because in real life they only were that way when they came out of the paint shop. After that they fade and are scoured by trees and bushes and stand at varying levels of dust and dirt and grime and hand-painted touch ups.

When it comes to tac signs its almost impossible to hand paint those. In real life they are always stencilled so they are pretty uniform and "crisp." I've found the only way to replicate that is with a good decal set - Microscale is a good line for that.

🍻
Unless you are talking BATUS, then the Tac Sign are all different. Just google "BATUS Landrovers" to see what I mean. Likely painted by some hungover Squaddie on extras thanks to the previous night on the town...
59dcda1a13483_batus65Dredtop.jpg.a19a7ab2eaa264c57db641cf34b28156.jpg

3771840128_5a481096ea_b.jpg
Nope. You can tell by the small black lines that they used stencils for those numbers. Hard to tell if they brushed or sprayed over those but the numbers are all uniform for height, width etc. Hard to achieve that freehand on a model.

🍻
 
Nope. You can tell by the small black lines that they used stencils for those numbers. Hard to tell if they brushed or sprayed over those but the numbers are all uniform for height, width etc. Hard to achieve that freehand on a model.

🍻
They changed stencils all the time, lets just say some people had a better grasp of art, than others.. I found multiple callsigns on my truck all different sizes as I sanded down the years of paint.
 
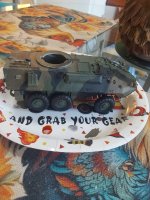
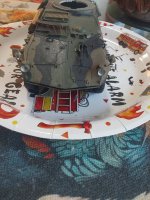
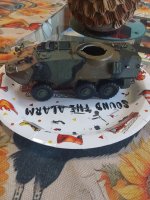
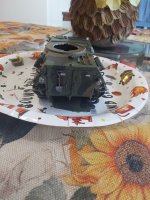
@FJAG @exspy @Colin Parkinson how are the colors for the 3 color camo now? The models almost done, im using it in preparation of the Centurion and M113 im buying, I did some color fine tuning but it's not sitting right with me still, it's also important cause these RC models are a lot more expensive then a model kit so I don't want to mess them up lol this is just my Cougar ive tried to make in Canadian 3 color, the flat aluminum windows and tail lights are curing before I add the next colors over top, like the orange marker lights I shared here they are flat aluminum with clear orange over top, that's the plan for the tail lights with clear red, as well as the view ports were supposed to get a clear black coat, but sadly I just have regular gun metal lol
 

Attachments

  • 20261029_142635.jpg
    20261029_142635.jpg
    1.1 MB · Views: 5
  • 20261029_142649.jpg
    20261029_142649.jpg
    1 MB · Views: 5
  • 20261029_142701.jpg
    20261029_142701.jpg
    1 MB · Views: 4
  • 20261029_142709.jpg
    20261029_142709.jpg
    1.1 MB · Views: 3
I think that you are pretty much there with the green and black. There's something in the tan/brown that I can't quite put my finger on. It looks okay in most places except the left side. That area on the left side under the turret is a bit too large and that may be drawing more attention to it. My recollection and the source photos had the green predominate with the black as a close second and the tan/brown as smaller areas.

I presume you are just brush testing it because we always sprayed and even from a distance, any brushed touch ups looked fairly smooth. In a number of places there's just too much texture.

There's a bit of a sheen on the front and left side. Our colours were dead flat even when freshly painted.

I don't want to sound negative here - I think that you are making good progress, but like you say the bigger models are too expensive for testing on so it's good to work it out here.

Cheers and happy modelling.

🍻
 
I think that you are pretty much there with the green and black. There's something in the tan/brown that I can't quite put my finger on. It looks okay in most places except the left side. That area on the left side under the turret is a bit too large and that may be drawing more attention to it. My recollection and the source photos had the green predominate with the black as a close second and the tan/brown as smaller areas.

I presume you are just brush testing it because we always sprayed and even from a distance, any brushed touch ups looked fairly smooth. In a number of places there's just too much texture.

There's a bit of a sheen on the front and left side. Our colours were dead flat even when freshly painted.

I don't want to sound negative here - I think that you are making good progress, but like you say the bigger models are too expensive for testing on so it's good to work it out here.

Cheers and happy modelling.

🍻
Unfortunately i messed up a few coats, im so much more used to using a gun, and I don't even have an airbrush currently, I'm waiting to buy one actually. Right now it's just brushes you are right, I also didn't know I could thin with water, and didn't have any thinner until after my smart idea to start painting anyway lol. So there's some texture build up as well as some pitting from my botched sanding job with my file lol. I've learned a lot on this model because I'm actually missing some pieces and some broke as well underneath, so it's the perfect model to practice brush painting and getting my colors right. When I'm done I might actually dip it in alcohol and get all the paint off and redo the paint job, but I also need more paint already from trying to mix the colors I used a fair amount lol. For the dark green and the olive color I'm feeling both are slightly off, I used a guide from an other modeler who makes Canadian units for a table top game, as well as tried to cross reference it with the hedgehog color guide that uses IPMS reference. The colors they provided are the colors I have now, but again both greens I feel are slightly off, the black is actually just NATO Black, it's what was recommended on the same forum as well as the vehicle collectors thread I found said the same thing. For the sheen I suppose I'm going to have to order a flat clear coat, these are all flat colors but they all have that sheen to it, I think it's just the nature of the acrylic paint. I can buy a flat clear that's suppose to make the paint truly flat however. You also don't sound negative at all, a harsh review is exactly what I'm looking for, im super nit picky myself but the issue here is I don't have great references that are either A not tainted by time, B dated reference photos, and C a good match to convert into the acrylic paint codes like XF-65 for random example. I also wasn't alive yet so I cant recall from memory lol, and my Opa has long passed so I can't really have him review these, tbh he's my motivation for trying to build these models and learn more about our role in germany. Ontop of modeling these and the RC, im actually developing a digital asset pack for the flight simulator DCS, they have a cold war germany map and it's next update is bringing Lahr and Baden set in the 1980s to the game. So my pack will have a flyable CH-135 and hopefully all the ground assets. As for the RC project that I'm doing here I'm starting with the M113, Centurion, and Lynx as my first builds, but the cheapest of them, the M113A1, is still like 350 to 400$ lol. So unfortunately that's partially the reason I haven't quite started, but I should be getting the M113 or Centurion this pay depending on how much the Centurion is after conversion to CDN. Thanks very much for your help, tbh I wouldn't be able to do this without yours and everyone else's help in here.

Here is Lahr in DCS if your interested in seeing how it looks, it's from a company called Urga Media
 
Back
Top